Cisco Wireless LAN controller (WLC) module components, regardless of the device it is present in, allows you to centrally manage and configure a number of access points (APs) in a simplified manner. Most Cisco Wireless LAN Controllers (WLCs) support the following features:
Distribution system ports: These ports are used to connect the WLC to a network switch and act as a path for data.
Service port: This port is used as a management or console port. This port is active during the boot mode of the WLC.
Management interface: This interface is used for in-band management and provides connectivity to network devices (such as DHCP servers or Radius servers). If you want to connect to the controller’s web management interface, it would be through this interface.
The management interface is assigned an IP address and is the initial point of contact for Lightweight Access Point Protocol (LWAPP) communication and registration.
AP-manager interface: This interface is used to control and manage all Layer 3 communications between the WLC and lightweight Aps.
Virtual interface: This interface is used to support mobility management features, such as DHCP relay and Guest Web Authentication.
Service-port interface: This interface is used to communicate to the service port and must have an IP address that belongs to a different IP subnet than that of the AP-manager interface and any other dynamic interface.
Dynamic interfaces: These are VLAN interfaces created by you to allow for communication to various VLANs.
Certexams.com updated its CCNA Network Simulator by adding WLAN controller GUI labs.
Limited features are made available in the simulator based on CCNA Exam Syllabus.
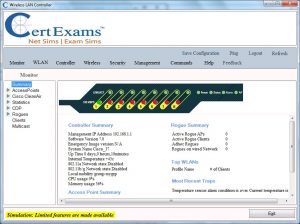
WLC Controller Main window is shown below
WLANS configuration steps
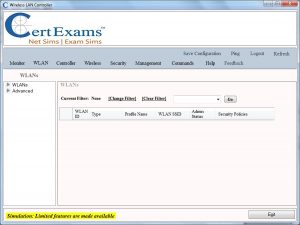
The WLAN tab on the menu bar enables you to create, configure, and delete wireless local area networks (WLANs) on your Cisco WLC. Use the left navigation pane to access specific WLAN parameters.
You can access the following pages from the WLANs tab:
-
WLANs
-
AP Groups
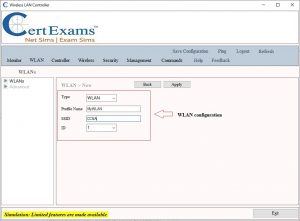
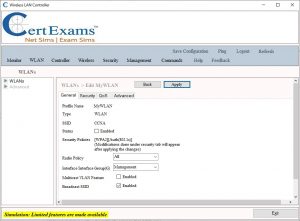
Creating a WLAN
- Choose a WLAN type (Guest LAN, WLAN, or Remote LAN) from the drop-down list.
- Enter a profile name for the WLAN in the Profile Name text box.
- Enter a text name for the WLAN in the WLAN SSID text box. (This is the SSID broadcast name for the WLAN.)
- Choose the ID number for the WLAN from the WLAN ID drop-down list.
- Click Apply to bring up the Editing WLANs page, where you can continue configuring the WLAN.
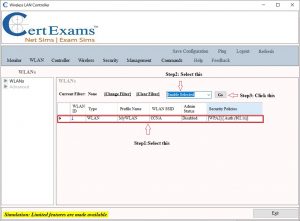
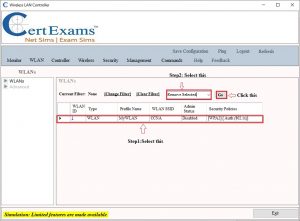
To enable or disable a WLAN from the WLANs page, select the check box to the left of the WLAN or WLANs, choose Enable Selected or Disable Selected from the drop-down list, and click Go.
Editing WLANs
To edit your WLAN settings, choose WLANs and click the Profile name to navigate to the WLANs > Edit page. For new WLANs, create a new WLAN as described in Creating New WLANs page, and then click Apply to navigate to this page.
This page enables you to edit the configurable parameters for a WLAN.
The WLAN > Edit page consists of the following four tabs:
- General
- Security
- QoS
- Policy-Mapping
- Advanced
To delete a WLAN, do one of the following:
- Click the blue arrow adjacent the profile and choose Remove. You are prompted to confirm the removal of the selected WLAN.
- Select the check box for the WLAN or WLANs, choose Remove Selected from the drop-down list, and select Go. You are prompted to confirm the removal of the selected WLAN.
- Click Go to select an option from the drop-down list.
For detailed functionality and configuration guide for WLAN controller download the following CCNA Network Simulator
Also check out this CCNA Exam Simulator have been updated with wireless simulator labs to confirm latest exam objectives.